Navigation Bar

Showing posts with label Create a Critter Cartridge. Show all posts

Thursday, January 26, 2012

GIVEAWAY: Treasure Alert & Trendy Twine Guest Designer: Happy Love Day

Hello my treasured friends!

I am ecstatic to be guest designing today over at Trendy Twine! They're definitely my FAVE twine company out there today, and if you haven't checked them out before, you really are missing out! They have beautiful colours, and a variety of different twists. You can check out all the twine that they have available here. I guarantee you, you won't be disappointed! ;)

For my project today, I am showcasing this month's newly released Cherry Cupcake, which is PERFECT for all your Valentine's Day projects. This twine has a double twist of red and pink, and it's oh so trendy! Can you spot all that trendy Cherry Cupcake twine? I'll be linking this up to Pink Cricut's Link Up Party, and Emma's Throwback Thursday Challenge.


Here's a close-up of the adorable birdie and turtle. I used more twine to add the XOXO's on the turtle's shell.


And here's a peek inside the card:


Trail of Treasures:
  • Card Base - 4 5/8 x 4 5/8 square card cut in red cardstock, and wrapped  Trendy Twine's Cherry Cupcake Twine around and tied a bow
  • Card Layer - 4 3/4 x 4 3/4 cut from Martha Stewart's Enchanted Woodland Mat Pad
  • Frame - cut at 4 3/4 x 4 3/4 from the Gypsy Wanderings Cartridge
  • Turtle - cut at 3" from Create-A-Critter Cartridge, face from PK-642 Boy Mates Assortment, added Crystal Accents to the eyes, hearts cut from Creative Memories Tiny Heart Punch, paper pierced X's and O's, and threaded Trendy Twine's Cherry Cupcake Twine, and added that same twine to the neck
  • Bird - cut at 2.75" from  Create-A-Critter Cartridge, added black mini-brad for the eye, and cut out a beak in orange
  • Hearts - used a mini punch and added  Crystal Accents
  • Sentiment - from Pink By Design's Love Always stamp set 

And now for the trendy treasure! Here are 10 yards of four different colours of trendy twine: Cherry Cupcake, Peppermint Stick, Strawberry Cupcake, and Chocolate Truffle. In addition, there's an adorable Imaginisce robot stamp up for grabs.
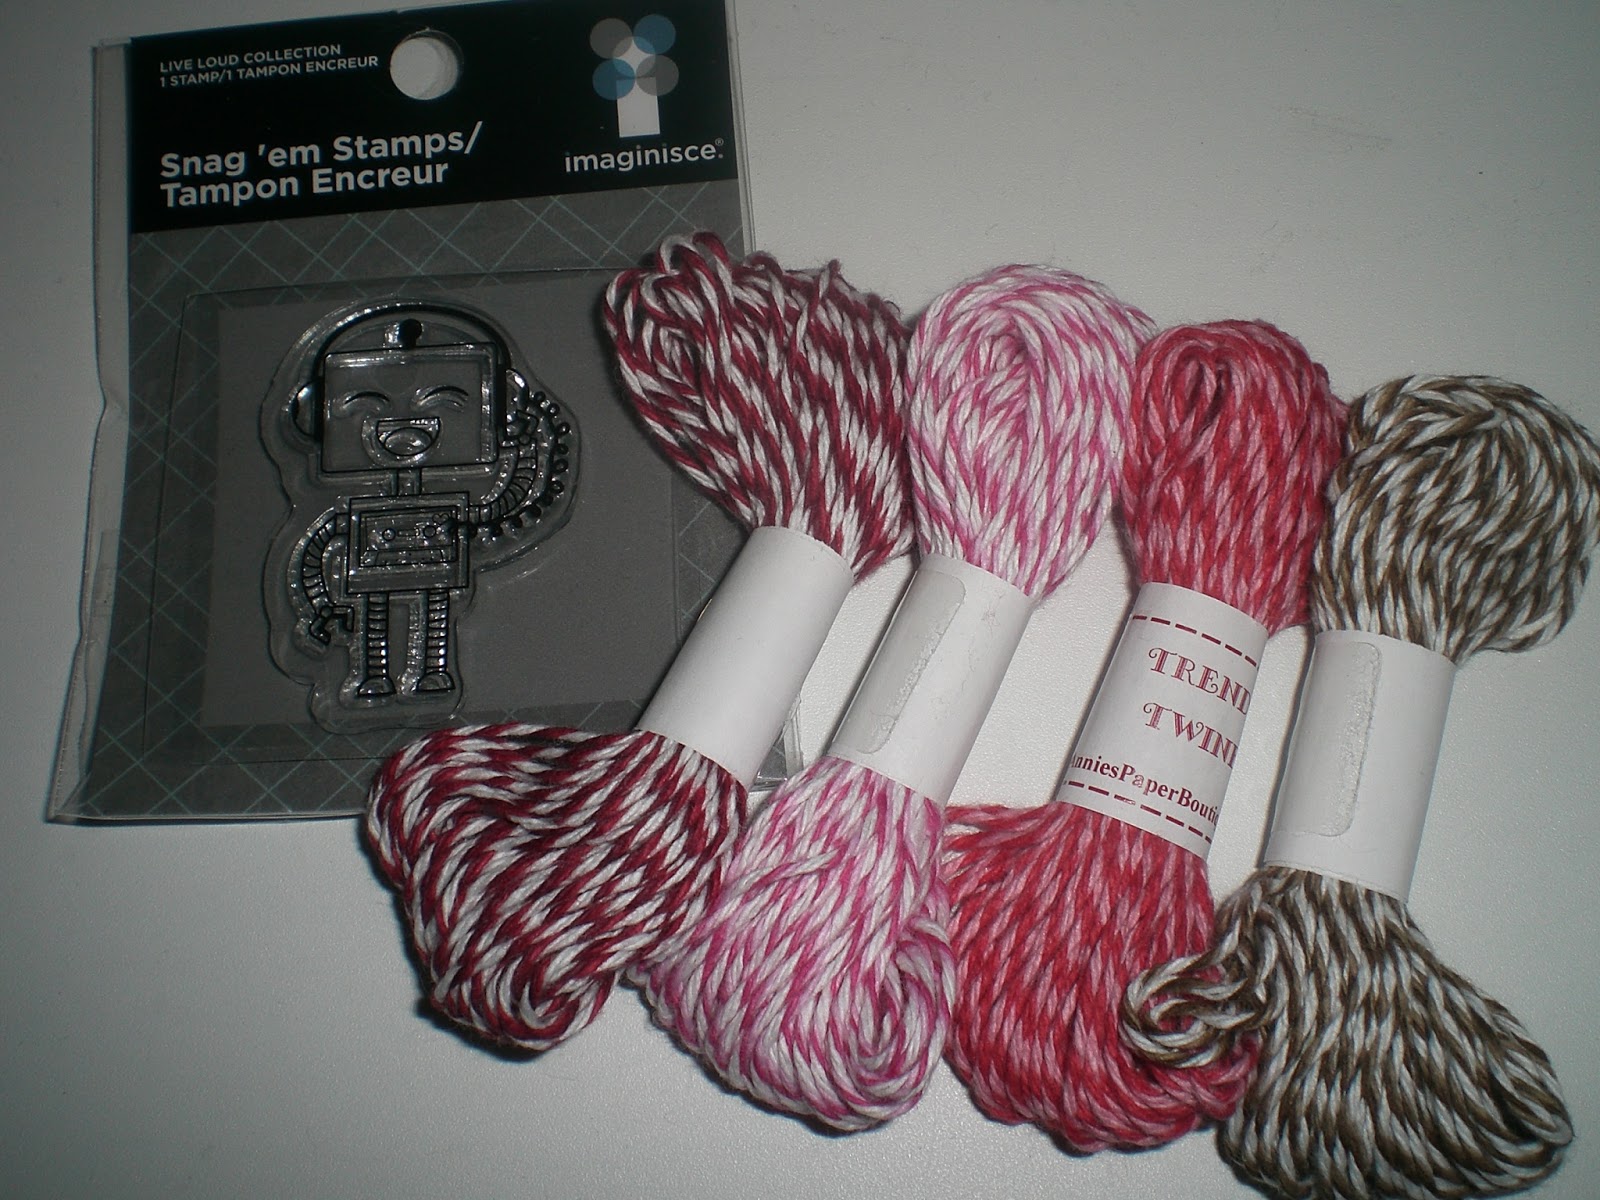

All you have to do is be a follower on my blog and comment below with your name and email address. For an extra chance to win, make you sure head on over and like my Facebook page, Tracey's Trail of Treasures. You have until Sunday night at 10PM PST to comment, and I'll announce the winner on Monday. Good luck everyone!

Make sure you head on over and visit Trendy Twine on their blog here, or over on Facebook! You will not be disappointed! :)
Until next time's treasures,
Tracey xox

Monday, October 10, 2011

Wobble till you Gobble

Happy Thanksgiving my Canadian friends!

Today and everyday we should be thankful for all those in our life - our family, friends, significant others, pets, etc. Don't forget to let all those around you know that you care for them, and live each moment as if it were your last.

It's been a super busy weekend here in our household, and unfortunately, I got called in to work last minute. My family friends and I have been keeping a huge secret from our sister -- her birthday is coming up in two weeks and she's been wanting a bunny forever. We finally gave her the bunny tonight, after a month of having it!

So here's to the gobble day! Let's gobble till we wobble!


To make him wobble, I added an action wobble:


And here's a look inside the card:


Trail of Treasures:
  • Card Base - folded a sheet of DCWV Harvest Gathering Paper in half, then ran it through the Cuttlebug with the 3.5" Small Scallop Circle Nestability
  • Turkey - cut at 3.15" from the Create-a-Critter cartridge, added feathers to the back, and attached to an action wobble; the face is from Peachy Keen Critter Faces Set and added Crystal Accents
  • Sentiments - stamped using Tim Holtz Vintage Photo Distressing Ink with the Pink By Design Bountiful Blessings Set

Thank you all my treasured friends -- I value each and every one of you for all your comments. This is all worth it cuz of all of you.

Until next time's treasures,
Tracey xox

Saturday, October 8, 2011

Let's Party till the Cows Come Home!

Hi everyone!

Two posts in one night - woot! That's a new record for me! I told you I had lots of crafy endeavors in the near future! Haha. Well, here in Canada we have a long weekend since Thanksgiving is this coming Monday, so be on the lookout for a thanksgiving project on Monday! Here's a card that I created for my friend's birthday - she loves cows, and we just celebrated with her last night. We definitely partied till the cows came home! Haha ;)

I will be entering this card into Jovan's Birthday link-up. She's working on a new scrap room so make sure to head on over to see it, and maybe you'll pick up a few organizing tips!


Isn't she a cutie?! Here's a look at the inside of the card:


Trail of Treasures:
  • Card Base - standard A2 sized card 5.5 x 4.25" base
  • Card Layer - cut from DCWV Spring Stack and used my Creative Memories Corner Rounder
  • Grass - cut out of green cardstock, and used scissors to make cut slits to create the grass, then wrapped Twisted Lime Trendy Twine and tied a bow
  • Cow - cut from Create-A-Critter cartridge, used mini-brads for the eyes, stitched with white gelly roll pen, and added ribbon bows to the ears
  • Party Hat, Party, and Present - cut from Cuttlebug Birthday Die, added Diamon stickles to the party hat
  • Sentiment - My Pink Stamper's Punnylicious stamp set 

 Make sure to tune back on Monday!

Until next time's treasures,
Tracey xox

Wednesday, September 28, 2011

A Tardy Bday Wish

Hi everyone!

I hope that everyone is off to a great start to their week! We're half way until the weekend! I've got tons of ideas for cards that I want to create, but I'm limited on time as I do have a group submission and a mid-term exam next week :( Hopefully I'll be able to sneak away from the pile of work I've got to do, to craft...even just for a little while! ;)

Remember, you still have time to enter into the current giveaway here.You have until this Friday at 12PM PST to enter. 

Here's a witty little birthday card I created for Sarah over at PinkCricut.com's sew-easy link up party and button birthday card challenge over at Birthday Sundaes.


And for the inside sentiment, I used My Pink Stamper's More Punnylicious Stamp Set.


Trail of Treasures:
  • Card Base - standard A2 sized card, 4.25 x 5.5"
  • Layers - used DCWV Spring Stack for the patterned paper and used the Stampin' Up Scallop Border Punch, used my We-R Memory Keepers Sew-Easy for the border of the yellow layer
  • Frog - cut from Sweethearts Cartridge, stitched, and added a button with a stitched cross for the eyes
  • Lily-Pad and Balloons - cut from Create-a-Critter Cartridge
  • Sentiments - 'a tardy birthday wish' made using the PBD Small Banners set; inside sentiment from My Pink Stamper's More Punnylicious Stamp Set.

That's all I have for you guys today! Gotta run to class now!

Until next time's treasures,
Tracey xox

Saturday, August 13, 2011

Back 2 School

Hello my treasured crafters!

My oh my! This past week has been a whirlwind! One exam done..two more to go! Thursday I'll be a free woman! :) So in the midst of studying, I was working on two projects. I'll be posting one today, and make sure to visit back on Tuesday - it's a good one! :)

So with all the back to school blog hops and challenges, I decided that I wanted to create a back to school project. Here in Canada, everyone doesn't go back to school until after the Labour Day holiday, which is usually sometime in September. So hearing that some kids in the States are heading back to school already is a bit bizarre to me. Nonetheless, no kids means more time to craft right?! :) Of course I don't have any kids yet, but I'm sure that I would have mixed feelings when I have to send my children back to school!

For my project, my inspiration came from the little ones. Whenever I think about back to school, I always picture the kids thrilled to go on the playground and they just throw their backpack on the ground and run for the slide or the swings! So that's exactly what I did!


I absolutely adore the Baby Steps cartridge. If you do not own this cart, you MUST get it. The images are SO cute and super easy to layer! I cut the 'sand' out of sand-paper. Neat eh? This is a 5 x 5 card base that I'll be entering into the following challenges:

Celebrate the Occasion Challenge 25 - Back to School
Peachy Keen Stamps LFIF - Shaped Card
Pink By Design Challenge 7 - Back to School Project

Trail of Treasures:
  • Slide and backpack cut from Locker Talk Cartridge
  • Patterned paper from DCWV Grade School Stack
  • Seeing Spots Cuttlebug Embossing Folder
  • Sign cut from Walk In My Garden Cart
  • Card shape cut from Create a Critter
  • Tim Holtz Vintage Photo Distress Ink
  • Apple cut from Doodlecharms
  • Boy cut fom Baby Steps Cart 
  • Face from PK-642 Boy Mates Face Assortment
  • Silver Foil Cardstock for Slide
  • White Gelly Roll
  • Crystal Accents
  • Sandpaper
  • Irock
All the best to all the little ones who did have to head back to school this past week! Make sure to tune back in on Tuesday for another Celebrate the Occasion challenge -- one that you do NOT want to miss! ;)

Until next time's treasures,
Tracey xox

Saturday, July 30, 2011

Christmas in July!

Hi everyone!

I hope that everyone has had a great kick start to the weekend! Here in Vancouver, we have a long-weekend, but so far all I've done is work :( Hopefully I'll get some down time soon..but school finals are approaching soon...sigh. I've really wanted to create Christmas cards, but with such a busy schedule, I haven't been able to get around to it yet. This November I'll be taking part in a craft fair so I really do need to get my Christmas craft on! You will see Christmas cards from me soon though! In the meantime, I thought that I'd share with you all the Christmas card I made for my boyfriend last Christmas.

This is a standard A2 sized card.

Here's a peak to the sentiment inside the card:


The sentiment is from Pink By Design's Christmas Wishes holiday sentiment set. This set is jam packed with holiday cheer! They're having a sale this weekend in celebration of their one year anniversary - everything 30% off here! Now how sweet is that?! You will not be disappointed - they've got sentiments, images, backgrounds, and supplies! Just use coupon code bigtimesaver30. Sale ends tomorrow - 07/31/2011 so don't miss out!!

Materials Used:
  • Sled and reindeer cut from Christmas Solutions Cartridge
  • Labels cut from Create a Critter Cartridge
  • Patterned paper from DCWV - Holiday Stack & Metallics Stack
  • Sentiment from PBD Christmas Wishes
  • Gifts - Jolee Sticker Embellishments
  • Creative Memories Corner Rounder
  • Foil Cardstock (Gold)
  • Black Sukura Pen
  • Crystal Accents
  • Specialty Twine
Hope this inspires you to get workin' on those Christmas cards! I know I sure am itching to get started but i still have a scrapbook to complete! Make sure you tune back on Tuesday for another Celebrate the Occasion Challenge

Until next time's treasures,
Tracey xox

Wednesday, July 20, 2011

Caterpillar Love - My Pink Stamper Design Team Call Challenge

Hello everyone!

Hope you are enjoying your week so far! It's been a super busy week for me both in school and over here in the blogging world! If you haven't heard already, I was selected as a Celebrate the Occasion design team member! This challenge blog has amazing challenges for all the major occasions - and cards are definitely needed!! The design team has so much talent, so you will not be disappointed!!

Remember, there's a giveaway going on here that you don't want to miss!

Now this past Monday was my third year anniversary! My boyfriend was so sweet - he knew that I had a challenging week ahead of me with a business presentation and an accounting report due, so he suggested that we celebrate our anniversary next week. He really knows how to read my mind, and he did relieve a bit of the stress that I was feeling! It's been three years that we've been together, but it feels like just yesterday that we met. I've known him for years now, and I definitely can't imagine the rest of the coming years without him! I love you! So enough with the sap! Here's the card that I made for my boyfriend for our anniversary, and for the My Pink Stamper Design Team Call Challenge.

For the challenge, you must include the colours:
--> Orange
--> Turquoise
--> Green
--> Brown
--> Optional: Any colour of your choice

With those colours in mind, I used my favourite cartridge Create a Critter to create this card. I like to call my boyfriend a caterpillar - and we have a song to go along with it! Haha:


The caterpillars just came out darling, didn't they?! :) I added eyelashes for the girl! This is a 5x5 square card base. I used My Pink Stamper's More Punnylicious stamp set to stamp 'love.' The full sentiment reads 'puppy love' so I taped over the 'puppy,' inked it up, then removed the tape to get just what I needed! I created the swing out of scraps, doodled on the seat to make it look like wood, added brads and twine, and voila!

Here's a close-up of the caterpillars:

Trail of Treasures:
  • Caterpillars and tree cut from Create a Critter cartridge
  • Grass cut from Everyday Paper Dolls cartridge
  • Sentiment from My Pink Stamper More Punnylicious
  • White gelly roll pen
  • Heart corner punch
  • Black fine tip pen
  • Specialty twine
  • Mini brads
  • Ribbon
  • Floss
If you'd like to participate in this Design Team Call Challenge, you can do so here. Remember, the deadline is this Wednesday!! Good luck!

Until next time's treasures,
Tracey xox

Tuesday, July 19, 2011

Hip, hip hooray! I'm a Celebrate the Occasion DT member!

Hi everyone!

I'm super ecstatic to announce that I've been selected as a Celebrate the Occasion design team member! I recently discovered this challenge blog and I absolutely LOVE it! Usually cards are exchanged during special occasions, and with the little amount of time that I have to craft, I usually only create cards for the special dates such as: birthdays, holidays, weddings, graduation, etc. This blog has challenges every week, and you have a chance to be entered into the drawing for a prize! Isn't that fabulous?! If you haven't been to their blog already, make sure to check it out here! I'll be posting projects for Celebrate the Occasion bi-weekly, so make sure to tune back in! For the design team call, we were asked to submit birthday projects that had never been posted before. My little cousin's birthday is in August, so I decided to get a head-start on her birthday card - I got her a cute Hello Kitty colouring book along with some other goodies so I decided to create a Hello Kitty card to go along with it! Enjoy!


The base of this card is 5 x 5. This is the first time I've used my Hello Kitty Greetings Cartridge - I didn't enjoy how this cart layered, but my Hello Kitty did turn out real cute! I used an action wobble to attach my cute little Hello Kitty! :) 


Trail of Treasures:
  • Hello Kitty Greetings Cartridge
  • Tree cut from Create a Critter
  • My Little Shoebox pattened cloud paper
  • Martha Stewart Daisy Border Punch
  • PBD Small Banners Stamp Set
  • PBD SOM 'Bugs'
  • Black Sukura Pen
  • White Gelly Pen 
  • Action Wobbles
  • Yellow Pearls
  • Ribbon
Congrats to all of the new CTO design team members! I look forward to working with you and seeing what you all create! :)

Don't forget my treasured friends about the treasure/giveaway going on here. ;) 

Until next time's treasures,
Tracey xox

Friday, July 1, 2011

O Canada

Happy Canada Day everyone!

Happy long weekend to a majority of you! Whether you're Canadian or American, we'll both be celebrating the pride for each of our nations! I know that it's been a while since I've posted - it's been a super busy week with midterms, assignments, and group projects. I really tried to break the pattern of posting four posts one month, six the next, and back through the cycle again, but with my laptop breaking down and school work, it just didn't happen. :(  I've got a little of a breather now..so after my celebrations I had to make some time to create a card to celebrate Canada's 144th birthday! 

This is a standard A2 sized card (4.25 x 5.5).  Representing Canada are our beavers!  It must have been the beaver fur trading way back then!  And of course, 'O Canada' is our national anthem :)

It definitely is extremely hard to find a Canada stamp set, but of course Pink By Design has one!  It's got some cute sentiments on it that really represent Canada :) You can purchase it here.

Materials Used:
  • Beaver cut at 3" from the Create-a-Critter Cartridge
  • Sentiment from Pink By Design Canada set 
  • Patterned paper from Recollections basics 
  • Tim Holtz Vintage Photo Distress Ink
  • Tim Holtz Fired Brick Distress Ink
  • Creative  Memories Corner Rounder
  • Brown flocking powder
  • Fiskars maple leaf punch
  • White gelly roll pen
  • Mini brads
  • Irock studs
  • Toothpicks
The sunshine came out just in time for the long weekend.  Be safe and enjoy everyone!  I've got loads of group projects to work on, but I've also got an entire scrapbook to complete by the middle of this month for my anniversary - stay tuned for that! Deadlines, deadlines, deadlines...

Until next time's treasures,
Tracey xox

Sunday, June 12, 2011

Crabulous Father's Day

Hello everyone!

I hope that you all enjoyed your weekend as it draws to an end - I wish I had gotten more school work done but on the bright side, I was able to finish two cards ;) While searching through blogs, I came across this new challenge blog - Celebrate the Occasion - and I think it's absolutely fabulous! Most of the cards that I make are for special occasions so I'm glad there's challenges just for all the many occasions out there! The challenge for this week was to create a Father's Day card. Father's Day is in exactly one week so if you haven't done so already, you need to create something for your father! I decided to also submit this into the Whimsical Wednesday challenge blog - create something for father's day. :)

Here's what I made for my daddy! My dad is a commercial crabber, has four kids, and is a kid at heart - he LOVES remote control helicopters && ice-cream (his fave flavour is strawberry!)! My dad is also quite the handyman. I'm definitely a daddy's little girl - I love you dad!

The card base is 5x5. 

Here's a close-up of the sentiment - it's hard to read in the first picture - I tried my best to snap a good shot of it but it was too tough! 

The sentiment is from Emma (My Creative Time)'s You're My Best Buddy set. It's difficult to read cuz I added Crackle Accents to give it a different look - more aged like items you would find at a beach :)

Materials Used:
  • Crabs cut from Create-a-Critter cartridge
  • Screwdriver & helicopter cut from Boys Will Be Boys cart
  • Tie and sand hills cut from Everyday Paper Dolls cart
  • Ice cream cone cut from Doodlecharms cart - possibly
  • Frame cut from Stretch Your Imagination cart
  • Sentiment from You're My Best Buddy stamp set
  • Patterned paper from DCWV Flower Shower Stack
  • Tim Holtz Vintage Photo distress ink
  • White Sukura Gelly Roll Pen
  • Crystal Accents
  • Crackle Accents
  • Googly Eyes
  • Irock gems
Wishing you all a great week & a happy father's day!

Until next time's treasures,
Tracey xox

Sunday, June 5, 2011

Happy Baa Day

I'm back everyone! Two posts in one day! Is that not pretty amazing for me, coming from the girl who posts on average..maybe four times a month?!? Over at Birthday Sundaes, on the first Sunday of the Month, the challenge is anything goes, as long as it incorporates some sort of a birthday sentiment. Make sure you head over and join the fun for Challenge 12!

I just wanted to quickly share with you this card that I made with the scraps of a birthday card I made for a friend. You can view the original here. I've used the adorable lamb from the Create-a-Critter cartridge for so many birthday cards so far -- it is just too cute!!I love the pennant! The stamp set that I used is a Pink By Design stamp set called 'Small Banners' which you can purchase here.


Materials Used:
  • Create-a-Critter cart for the lambs, party hats, and pinwheel
  • Echo Park Springtime 6x6 paper pad for the patterned paper
  • Pink By Design Small Banners image set for pennant banner
  • Gray, brown, and white flocking powder
  • Ribbon for bows and ground
  • Rhinestone
  • Mini Brads
  • Twine
 If you haven't had a chance to yet, you can view my Father's Day card idea here.

Have a fabulous start of the week everyone! 

Until next time's treasures,
Tracey xox

Friday, June 3, 2011

Window shopping anyone?

Hi everyone!

It's Friday and there's SO much going on in the crafty blogging world! Pink Cricut is having her UStream for her June release tonight, and Peachy Keen Stamps is about to reveal their June release! Lots and lots going on! I can't wait to see what they've all come up with cuz I know they'll be fabulous as always! I just wanted to share a quick card with you all today. We all love shoes, and when we're window shopping, we always spot a pair that we want to either pick up or try on! This is one of the projects I entered into Sarah's design team call. We'll find out tonight who's lined up next to join her team! *fingers crossed*

This is a 5x7 card - I welded the window to a rectangle in my Gypsy and inked the edges. You can't tell by the picture but I added a piece of acetate to create the 'glass' of the window and attached it with glue dots to the inner base, then on my patterned paper I marked the areas of the window so that I could place the shoes 'inside the window,' then used glue dots again to attach the patterned paper.

Here's the inside of the card:

Materials Used:
  • Window from Christmas Solutions Cartridge
  • Rectangle from Plantin Schoolbook
  • All the shoes cut from Formal Occasions Cartridge
  • Create-a-Critter Cartridge for label shape inside the card
  • Zebra print paper from DCWV All Dressed Up stack
  • Pink by Design February Stamp of the Month: Designer Boots for inside sentiment, and I only inked up shoes and stamped it repeatedly for the edge border
  • Creative Memories Round Corner Punch
  • Irock Gems in Black and Pink
  • Cuttlebug Swiss Dots Folder 
  • Blue and Pink Floss
  • Crystal Accents
  • Flower Brad
  • Acetate
  • Glitter
Cute, huh? Hope you all like it! Make sure you come back and visit this weekend for Father's Day card ideas! On a side note, I just started a Twitter account. If you use Twitter, I'd love to hear from you! You can find my account on the left side bar.Thanks and enjoy your weekend!

Until next time's treasures,
Tracey xox

Sunday, May 29, 2011

Birthday Lambs

Hello all!

I hope that everyone's weekend has been superb so far! The sunshine is out here in Vancouver and it's turning out to be more of a gorgeous weekend than we had intended! All we've been getting lately is clouds and rain which is unusual for the end of May. Regardless, happy long-weekend to all the Americans as you celebrate Memorial Day!

Today I have a card for you all that I made for my sweet friend Amy. She just turned 2-0 which is a super big deal! Haha! She's no longer a teen! I ensured her that her 20s will be great, if not better than her teenage years! ;) So, since her sister told me that she's in love with sheep, I created this sheep card for her to depict her and her sister (they're really close!). Surprisingly, according to the Chinese zodiac, Amy is also born in the Year of the Sheep just like my younger cousin. Lots of sheep cards for me! This one is a standard A2 sized card.


Materials Used:
  • Create-a-Critter cart for the lambs, party hats, and pinwheel
  • Echo Park Springtime 6x6 paper pad for the patterned paper
  • Pink By Design Small Banners image set for pennant banner
  • Gray, brown, and white flocking powder
  • Rhinestones and pearls
  • Ribbon for bows
  • Mini Brads
  • Twine
Here's a picture of my sister and I with the birthday girl:


Once again, happy birthday Amy dearest!

Hope you all liked the card! :)

Until next times' treasures,
Tracey xox

Monday, May 23, 2011

LFIF Peachy Keen Challenge: Organize It

Hi everyone!

I hope that everyone enjoyed their weekend! In Canada (particularly B.C.), we just had a long weekend. Although the sun didn't make its way out till the very end (better late than never!!), it was still an enjoyable weekend with great friends and good food.

This weekend I was able to get a project done. I worked on the Let's Face it Friday Peachy Keen Challenge: make anything that will help you become more organized. My boyfriend's niece and nephew throw their papers everywhere once they get home from school, or even the ones that they draw. Thus, I decided to make something for those youngsters to keep their drawings in.


This is a paper organizer that you can keep on your fridge. You can easily open it up and add papers to it -- drawings, notices, you name it. What I did was take an 8.5 x 11 sheet of cardstock, folded it in half, adhered a strip of patterned paper to the end of one side, and used a circle punch to punch out just half of the circle, and used my ATG to tape down the ends. When you open it up, this is what it looks like:


Then, I added my images to the front, and finished it off by adhering two magnetic strips to the back.


This is the finished project attached to the fridge. Of course, you'd have to place it down lower on the fridge in reach of the little ones. That way they can be more hands on with their own school work, cleaning, etc.

Wednesday, April 27, 2011

True Love: Kiss Me, Hug Me, && Luv Me

Hi everyone!

I'm honoured to be asked by Emma (My Creative Time) to be a guest designer for her and her line of stamps! I was introduced into the blogging world by curiosity -- searches on YouTube led me to find Robyn (mypinkstamper), and that was where I discovered Emma a little less than a year ago. Emma was my favourite member of Robyn's design team -- always creating such beautiful creations. I gotta say Emma, you're a true inspiration :) Once Emma started her own line of stamps at the beginning of this year, I knew that she wouldn't disappoint us!

So for today's Throwback Thursday Challenge, the challenge is to create something 3D -- a gift item, card set, etc., using ANY older Cricut cartridge. So for my project today, I created a set of three cards for a card set. All of the cuts are from the Create a Critter cartridge (my fave!) and all the sentiments are from Emma's first release, You Had Me At Chocolate which you can order here.


So for my first card, I made it for the Peachy Keen Sketch Challenge. I had no idea that my inspiration would come from that! I created the card first and decided that it needed a stamp saying, "kiss me." I wasn't quite sure if I had any stamps that said the following but to my surprise, I found it on Emma's set! Then I saw the Luv Me, and Hug Me sentiments, and from that I knew what I wanted to do for the card set! :)

Here is the first card that I created, using the kiss me sentiment. You can view the post here.


The second card I made for this card set, I used the luv me sentiment, and inked it up the "luv" and the "me" each time separately to go around the heart. In between each luv me, I separated it with small doodles of white hearts.


Materials Used:
  • DCWV Playtime Stack
  • Recollections Cardstock
  • You Had Me At Chocolate stamp set
  • Create a Critter Cartridge
  • Everyday Paper Dolls Cartridge
  • Plantin Schoolbook Cartridge
  • Flocking Powder
  • Ribbon
  • Mini brads
  • Sukura Gelly Roll Pen

Saturday, April 23, 2011

Kiss Me: Peachy Keen Sketch Challenge 50 with a Twist

Hi everyone!

Welcome to all of you who are new to my blog, and thank you all for the sweet comments! I hope that from my blog you'll be inspired to create meaningful projects for others. I'm definitely enjoying my time off school right now -- as I get to craft! I have lots of projects that I need to motor through as well as tons of activities and such, so we'll see how much I can do. But this is the third post in the last week which is pretty impressive for me!

I decided to take part in Peachy Keen's Sketch challenge this week cuz I could not resist! It's their 50th challenge, so the challenge is to follow the sketch, but there's a twist: you gotta include the colour gold in your project. So here's the sketch:


I made a frog prince card for a friend's birthday last year -- she needs to find a Prince Charming! I wanted to use the same cute frog from Create a Critter again, so that's what I did! Here's what I came up with:


The patterned paper (with the little frog faces) is from DCWV Playtime stack. This sheet of paper is one of the main reasons I got the stack (well actually, I love the entire stack) but I loved these cute little frog faces! So I knew I would have to cut the cute frog again out of my fave cartridge! And every frog prince needs a kiss to turn back into a prince right?! You can't really tell in the picture but I embossed the sentiment from one of my favourite stamp sets -- Emma's You Had Me At Chocolate and used Crystal Accents to add some gloss to plump up all the lips. I cannot live without Crystal Accents -- they just add so much to any card! And lastly, I used my adorable Peachy Keen stamps to bring my little froggie to life. I used PK-493 Everyday Character Face Parts and MORE!

So until next time's treasures, ta-ta my crafty friends! :)
Tracey xox

Tuesday, April 19, 2011

Easter is on its way!

Hello my crafty friends!

Since Easter is quickly approaching, I had to finish up some treat holders for my younger cousins and my boyfriend's niece and nephew. I found these favour boxes at the Dollar Tree in the States and decided to pick them up and jazz them :) I thought that the material would be glossy but it's just regular cardstock which was a bit of a disappointment, but needless to say, they worked well! Here's the packaging for these favour boxes.


For my first box, I decided to keep it nice and simple. I used Martha Stewart's Garden Trellis border punch and the image is cut from the cart, A Child's First Year at 1.5". The sentiment is from Emma's Color Me Happy Stamp Set which you can purchase here. I had some material butterfly embellishments that I added to the handle and blinged it up just a tad with my irock :)

Saturday, April 2, 2011

Baa Baa: Happy Birthday Little One

Happy Saturday Everyone!

This will be a super quick post! I didn't think that I'd be back so soon, but I just had to enter the Birthday Sundaes Challenge at http://birthdaysundaes.blogspot.com/! This time, anything goes, but you just always gotta make sure to include a birthday themed sentiment. Here is a card that I made for my little cousin's birthday a while back. She's born in the year of the sheep, according to the Chinese Zodiac.


I used some cotton to make my lamb's wool. She's so fluffy! :) I used Crystal Accents for the eyes, mouth, nose, and on the heart in the balloon. For the sentiment, I used Stampin' Up's Think Happy Thoughts stamp set, and the cute lamb is cut from Create a Critter.

Enjoy your weekend everyone! This time, I really won't be back until mid-April since I'll be studying hard for exams!

Until next time's treasures,
Tracey xox

Monday, March 28, 2011

My Hunny Bunny

Hello everyone!

It has been a while since I posted anything, but let me assure you that I've been longing to get crafting! In between homework, studying, working, mom duties (my mother is away on a trip), and getting over a bad case of the flu, crafting seems near to impossible. Today however, I decided that I really needed to rest, and card-making is good rest :) I really wanted to participate in the Peachy Keen Sketch Challenge 48 (sketch provided below) and Emma's Throwback Thursday Challenge.


For Emma's Challenge she asked to use an older cartridge and the colour GREEN. Scrapbookaholic By Abby's Challenge is to create anything Spring, so this card will be entered over there too! :) In addition, the Fantabulous Cricut Challenge Blog's Challenge #53 is to create a project using any spring time theme, so this project will be there as well!

So here it goes! I made this card for my boyfriend that I'll probably give to him over Easter :) I've been dying to use the Cricut Lite Cartridge, Bloom for the fence. I got it basically because of the fence! I haven't used it till now cuz I knew it would be perfect for this card!

With the fence closed, this is what the card looks like. 

And here is my hunny bunny! 

Tuesday, February 15, 2011

Parcels of Love

So today is Guest Designer Day over at pinkcricut.com! Please do make sure to view the original post on Sarah's blog! : ) I'm super thrilled to share a project with you, showcasing Sarah's phenomenal line of Pink By Design Stamps! Sarah was the one who gave me the final push to start a blog, so welcome everyone!

The project for you today was for my Valentine. I decided to wrap his gifts, and decorate the packaging to coordinate with the card that I had made him -- I made the card back in December during my break between semesters since I knew that during the school semester I would, unfortunately, not have the time to do much crafting. :( The card is what I submitted for Sarah's Pink By Design Team Call. The gift wrapping is pretty simple and I had to keep it simple cuz it was a super hectic week for me at school! 

Let's begin! Sarah's stamps are extremely versatile - I used them for a card and tags for today's post but of course they can be used for a number of different projects.

For my first project, a gift bag: